Block Walls and Pillars – Union Street, Clearwater, FL
Setting Up Block Posts and Pillars
Jul 14, 2021 · 3 min read min read
Discover our secret in ensuring that the walls of your future home are durable and long-lasting.
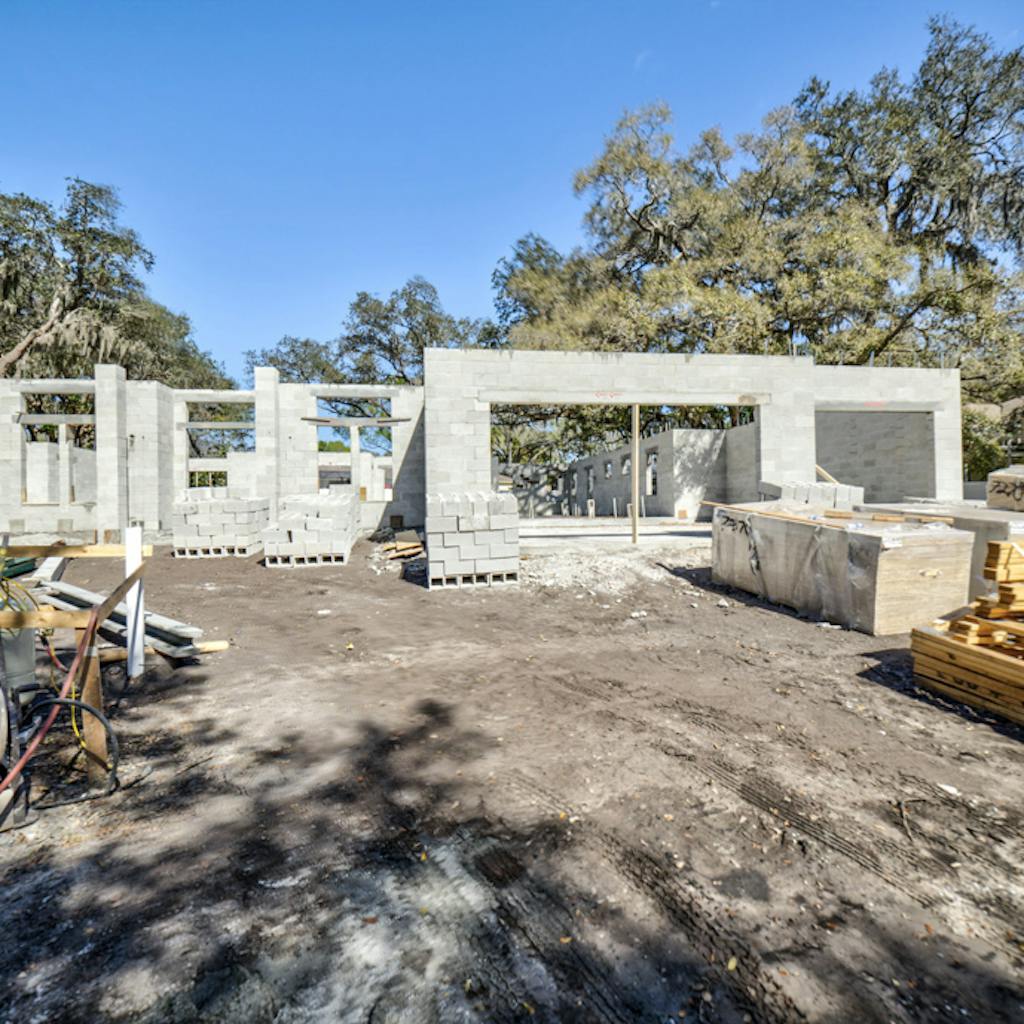
Concrete blocks offer maximum versatility, strength, dryness, energy efficiency, and durability at a minimum cost and the fastest speed. This is why it is our clients’ material of choice for exterior walls. Block walls and pillars are an alternative to concrete walls that may be ready mixed on-site or precast in a factory.
You can see that install blocks on the job site need advanced planning to make sure window and door openings are properly measured and placed. The key has a flat horizontal slab that is entirely level. So that when blocks are placed, they are also level. We use a laser level and chalk line to also ensure the entire block wall segments are straight.
Lintels, or elevated beams, support the wall above the opening or space between two vertical supports and must be self-supporting over time. You can see we use vertical wood beams at the openings until all the mortar is cured and those pieces of lumber can be removed.
Standing block pillars are also carefully measured out and are placed at the end of where the roof trusses are to sit. The height of the pillars needs to match the same height as the walls. Thereafter, they will transfer weight down to the earth. The blocks all share and split the supporting responsibilities of the entire roof structure, including the trusses, sheathing, shingles, insulation, wiring, ducting, and ceiling drywall. Luckily the weight is split among all the blocks. Otherwise, you will see cracks form when an unbalanced system is created.
Block Walls and Pillars Gallery
You can see where the house sits relative to the rest of the lot.
The concrete slab needs to be poured level prior to concrete block wall placement.
The penetrations are for plumbing, gas and electrical connections.
All the openings should be premeasured and accounted for during placement.
Standing pillars that will be supporting the roof also need to be erected with blocks.
Setting Up Block Posts and Pillars
Step 1: Layout
Determine the location and placement of the post/pillar. You have to make sure everything lines up with the survey plan. You have everything marked out beforehand and during with a laser and proper measurements.
Step 2: Building your Block Post/Pillar
Install the first course with 4 corner blocks with the long sides facing out. Square up and level the blocks. Use shims if needed to help level the blocks if the existing surface is not level.
Step 3: Continue Building your Post/Pillar
Continue stacking courses, alternating between the patterns shown to offset the seams from the course below until the desired height is achieved. Do not stack the blocks up using only one pattern (seams should not create a straight line the full height of the post/pillar).
Step 4: Finish Your Post/Pillar
Finish the post with post caps if needed. Secure the Post Caps in place with a bead of flexible concrete adhesive along the outside edge of the top course of Corner Blocks, and then set the Post Caps in place. Taller posts/pillars will require added stability.
Do you find these pieces of information helpful in ensuring that your future home, perhaps in Tampa, Lutz, and Clearwater would be ok. If you need help, get it from trusted custom home builders or general contractors from the area. Always the best thing to do!
Share this article
Last updated on Jul 17, 2026